I'll tell you about the concept of id in shaders and show you what it is for. If you're not familiar with shaders, start with The Book of Shaders — the best tutorial on the subject.
The code in the article is for twigl.app editor in “geekest (es300)” mode.
The purpose of the trick is to make the picture more complicated and gain control over each of the tiny parts.
I will first outline the algorithm, and then illustrate the trick with code and pictures. The algorithm is as follows:
- Set all pixels to the same initial id. For example, let it be
1. - Split pixels into groups. The group into which the pixel falls depends on its previous id and an additional criteria.
- Repeat step 1 several times, each time increasing the number of id's and complicating the picture.
- Use the id to calculate color, texture, animation speed, whatever.
There are two ways to calculate the id: accurate and chaotic. Let's test both of them:
Accurate segmentation
Suppose we want to divide the image into three parts each time. We also want to ensure that none of the two segments have the same id's, no matter how many of them there are.
There is a way to do this. The first time we split pixels into segments, we give each segment ids from 0 to 1, so that they are equidistant from each other: id=0, id=1/3, id=2/3. The next time we split each segment into three more segments, we add smaller values to their ids: id=id+0, id=id+1/9, id=id+2/9.
Each next division should change ids on a smaller and smaller value.
With this algorithm, we can guarantee the uniqueness of each and every id, hooray. Let's try to repeat the idea in code:
vec2 uv = FC.xy/r;

float id=0., k=1.;

uv=fract(uv)*3.;

id+=floor(uv.x)/3.; // split into three columns
k/=3.;
id+=k*floor(uv.y)/3.; // split into three rows
k/=3.;

uv=fract(uv)*3.;

id+=k*floor(uv.x)/3.; // split into three columns
k/=3.;
id+=k*floor(uv.y)/3.;  // split into three rows
k/=3.;

o+=id;

We see that each segment has its own unique color, but we have to use the multiplier k, which is not always convenient. A chaotic approach is often sufficient.
Chaotic segmentation
Last time we carefully added three different values to different subsegments of each segment.
Now we are also going to use the previous value of id to find subsegment ids. The difference is in the function we use: now we use a pseudo-random one, that takes any number (seed) as input and returns a random number from 0 to 1. The trick is that for the same argument (seed) it returns the same random value.
↓ subsegment id              ↓ segment id
id = rnd( floor(uv.y) / 3. + id )
         └─────────────────────┘  seed
         └────────────────┘ thing,
         that makes seed different
         for different parts of the segment
Code:
#define rnd(x) fsnoise(vec2(x))
vec2 uv = FC.xy/r;

float id=0.;

uv=fract(uv)*3.;

id=rnd(floor(uv.x)/3.);  // split into three columns
id=rnd(floor(uv.y)/3.+id);  // split into three rows

uv=fract(uv)*3.;

id=rnd(floor(uv.x)/3.+id);  // split into three columns
id=rnd(floor(uv.y)/3.+id);  // split into three rows

o+=id;
We can see that the grid is chaotic, maybe some regions will have the same IDs, but unlikely.
Segments variability
Fasten your seat belts. Now for the coolest part. You can make the settings for subsequent splits dependent on their current id!
For example, here the number of splits can vary depending on the id:
#define rnd(x) fsnoise(vec2(x)+.1)
vec2 uv = FC.xy/r;

float id=0.;

uv=fract(uv)*3.;

id=rnd(floor(uv.x)/3.);  // split into three columns
id=rnd(floor(uv.y)/3.+id);  // split into three rows

uv=fract(uv)*3.;

//                 ↓ the smaller id, the denser the pattern
id=rnd(floor(uv.x/id)/3.+id);  // split into three columns
id=rnd(floor(uv.y/id)/3.+id);  // split into three rows

o+=id;
You can repeat and repeat the split as much as you like. Or better add a loop, so as not to duplicate the code for each iteration.
#define rnd(x) fsnoise(vec2(x)+.1)
vec2 uv = FC.xy/r;

float id=1.;

for(int i=0;i<3;i++){
  uv=fract(uv)*3.;
  id=rnd(floor(uv.x/id)/3.+id);
  id=rnd(floor(uv.y/id)/3.+id);
}

o+=id;
If we increase the number of iterations to 5, there will be only noise left:

We can make the number of loop repetitions dependent on the id as well!
#define rnd(x) fsnoise(vec2(x)+.1)
vec2 uv = FC.xy/r;

float id=1.;

for(int i=0;i<5;i++){
  uv=fract(uv)*3.;
  id=rnd(floor(uv.x/id)/3.+id);
  id=rnd(floor(uv.y/id)/3.+id);
  if(i>0 && id<.5) break;
}

o+=id;
The picture went dark, it' s something of a survivorship bias. We exit the loop when the id is less than .5, and those pixels get a darker color. This can be fixed by replacing the id < .5 condition with rnd(id) < .5.

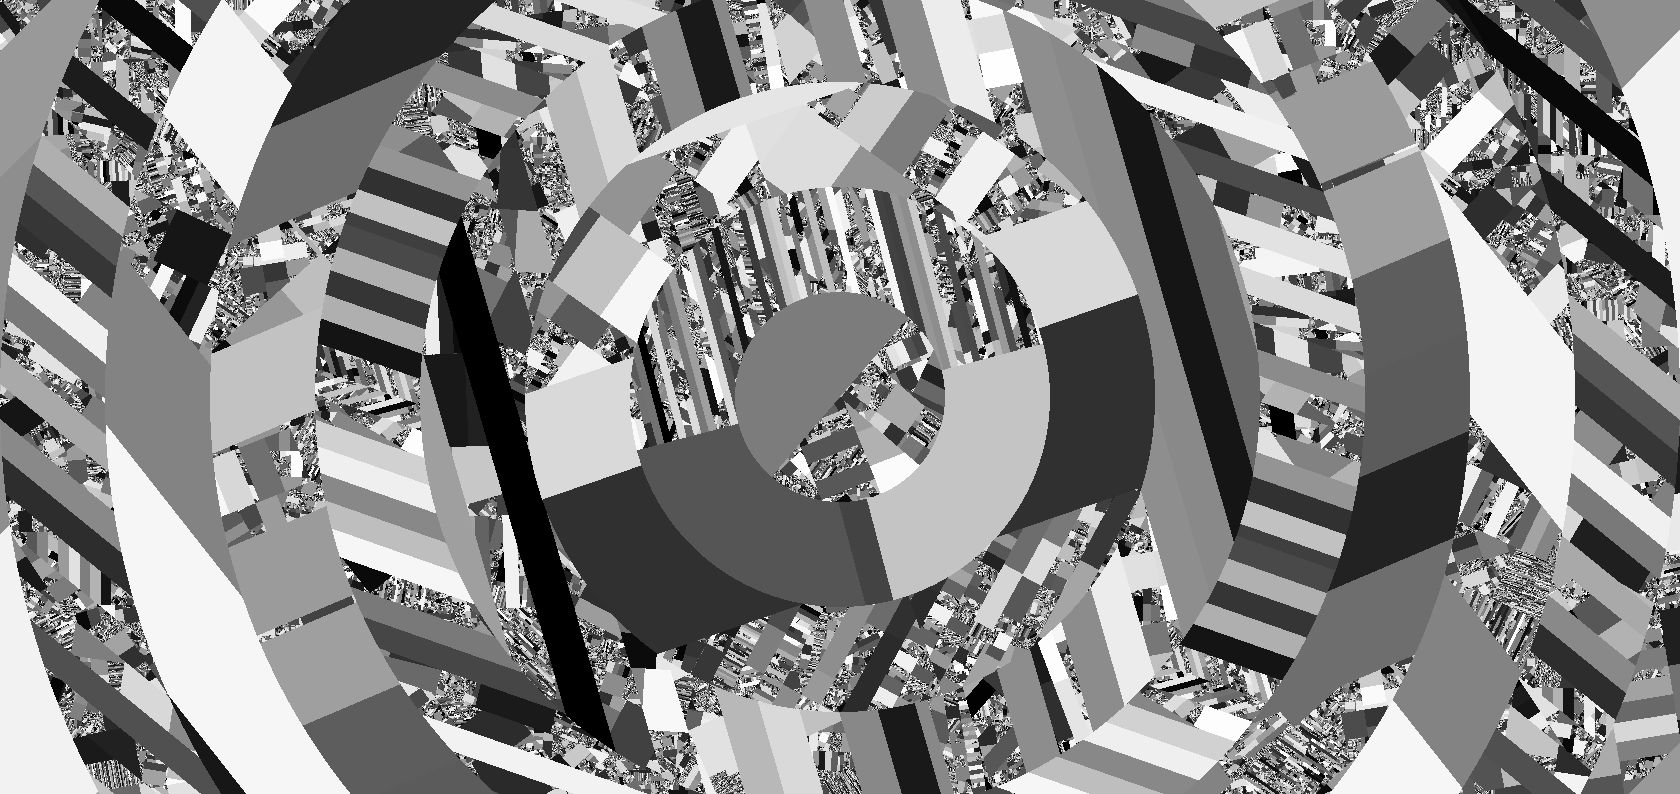
And now that the technique is mastered, you can go and have fun all the way!
#define rnd(x) fsnoise(vec2(x)+.1)
#define rot(a) mat2(cos(a),-sin(a),sin(a),cos(a))

vec2 uv = (FC.xy*2.-r)/r.x;

float id=floor(length(uv)*8.)+1.;

for(int i=0;i<5;i++){
  if(i>0 && rnd(id)<.5) break;
  uv*=rot(PI/4.+t*(rnd(id)-.5));
  uv=fract(uv)*3.;
  id=rnd(floor(uv.x/id)/3.+id);
  id=rnd(floor(uv.y/id)/3.+id);
}

o+=id;
Check out the link, it spins! And, surely, the rotation speed of each piece depends on its id :-)